
Brilliyo Institute – Payment Settings
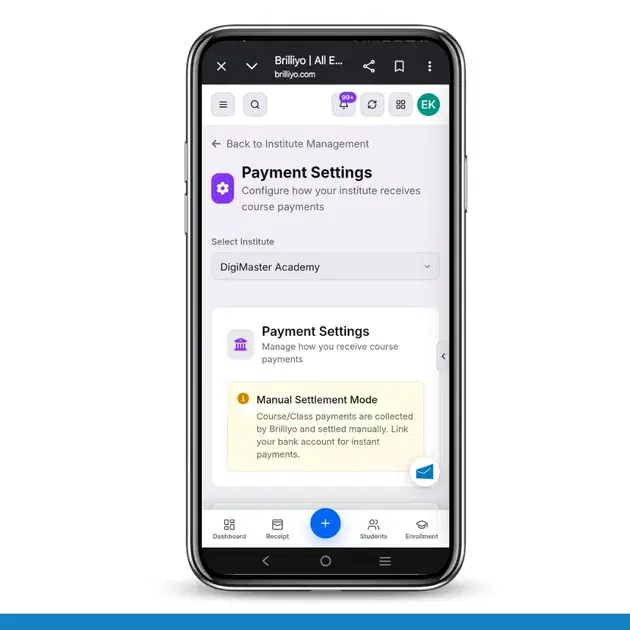
1. Overview
The Payment Settings feature allows institutes to configure how they receive payments from students who purchase their courses or classes.
Institutes can link their bank accounts to receive payments directly or use the manual settlement mode, where Brilliyo collects payments and settles them manually.
This feature helps institutes manage course payment collection, track earnings, and monitor payouts.
2. Open Payment Settings
Follow these steps:
Log in to your Brilliyo account.
Open the Institute section.
Navigate to Payment Settings.
Select the institute for which you want to configure payment settings.
Example: DigiMaster Academy or Brilliyo.
3. Select Institute
The Select Institute option allows you to choose the institute whose payment settings you want to manage.
Click Select Institute.
Choose the required institute from the available list.
The payment settings for the selected institute will appear.
Note: Make sure you select the correct institute before updating payment settings.
4. Manual Settlement Mode
Manual Settlement Mode is used when the institute has not linked a bank account.
In this mode:
Students make course or class payments through Brilliyo.
Brilliyo collects the payments.
The institute receives the settlement manually.
Institutes can contact support to request payouts.
Example: If a student purchases a course, the payment is collected by Brilliyo and settled to the institute manually.
5. Earnings Summary
The Earnings Summary section helps institutes monitor their payment and payout information.
It displays three important details:
Metric | Description |
|---|---|
Total Earnings | Total amount earned through course payments |
Paid Out | Total amount already transferred to the institute |
Pending Payout | Amount that is still waiting to be settled |
Example (Illustrative Data):
Metric | Example Amount |
|---|---|
Total Earnings | ₹25,000 |
Paid Out | ₹15,000 |
Pending Payout | ₹10,000 |
These figures are examples for understanding the dashboard. Actual amounts depend on institute transactions.
6. Link Bank Account
Institutes can link their bank accounts to receive course payments directly.
Follow these steps:
Open Payment Settings.
Select the required institute.
Find the Link Bank Account option.
Click the button to start the bank account linking process.
Follow the verification instructions displayed on the screen.
Submit the required bank account details.
Once the account is linked, Razorpay may take 1–2 business days to verify the account details.
After successful verification, payments can be routed directly to the institute's bank account.
7. How Payment Routing Works
Brilliyo supports two payment settlement methods.
A. With Linked Bank Account
The institute links its bank account.
A student purchases a course.
The payment is automatically transferred to the institute's bank account through Razorpay Route.
Payment routing begins after successful account verification.
B. Without Linked Bank Account
The student purchases a course.
Brilliyo collects the payment.
The institute receives the payment through manual settlement.
The institute can contact Brilliyo support to request a payout.
8. Bank Account Verification
After linking a bank account:
Razorpay verifies the submitted bank account details.
Verification may take 1–2 business days.
Payments will be routed once verification is complete.
Until verification is completed, direct payment routing may not be available.
9. Benefits of Payment Settings
Configure course payment collection.
Link an institute bank account.
Receive course payments directly after verification.
Track total earnings and payouts.
Monitor pending settlements.
Understand manual and automatic payment routing.
10. Important Points
Select the correct institute before managing payment settings.
Linking a bank account enables direct payment routing after verification.
Without a linked bank account, payments are collected by Brilliyo and settled manually.
Contact support to request manual payouts.
Razorpay verification may take 1–2 business days.
Quick Navigation: Institute → Payment Settings → Select Institute → Review Earnings → Link Bank Account → Complete Verification.
Tags:
Related Documentation
Brilliyo System Admin
The Access Control feature allows the System Admin to manage user accounts, assign product access, control permissions, and review access requests.
Brilliyo Institute – Notifications
The Notifications feature helps institute administrators and staff stay updated about important activities happening inside their Brilliyo workspace. It displays alerts related to student management, financial transactions, CRM and lead management, emails, and other activities that users have permission to view. In simple words, Notifications work like an activity alert center, where users can check important updates without manually visiting every section of Brilliyo.
Brilliyo Institute – Institute Management
The Institute feature allows users to create and manage their educational institutes on Brilliyo. Users can register an institute, select the required Brilliyo products, update institute details, manage branches, add metadata, and delete an institute when required. This feature helps institutes manage their institutional information and access different Brilliyo services from one place.