
Brilliyo System Admin
1. Overview
The Access Control feature allows the System Admin to manage user accounts, assign product access, control permissions, and review access requests.
It provides a centralized dashboard where the System Admin can check existing users, manage their access, and control who can use different Brilliyo products.
In simple words, Access Control helps the System Admin decide who can access Brilliyo, which products they can use, and what actions they are allowed to perform.
2. Access Control Dashboard
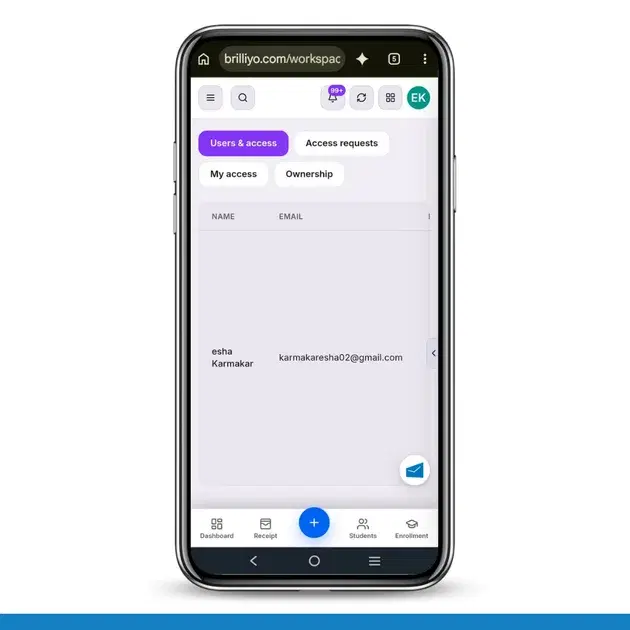
When the System Admin opens the Access Control section, the dashboard displays the existing users and their access information.
The dashboard includes the following tabs:
Users & Access
Access Requests
My Access
Ownership
3. Users & Access
The Users & Access tab displays the list of users who have access to the Brilliyo workspace.
The table contains the following information:
Column | Description |
|---|---|
Name | Displays the user's name |
Shows the registered email address | |
Preset | Displays the assigned access preset, such as Admin |
Products | Shows the Brilliyo products assigned to the user |
Pending Requests | Displays the number of pending access requests |
Actions | Provides available user management actions |
Example:
Name | Preset | Products | Pending Requests |
|---|---|---|---|
Esha Karmakar | Admin | ERP, CRM, Books, LMS, Attendance, Exams, Transport, Account | 0 |
This is an illustrative example based on the dashboard information provided.
4. How to Manage Existing Users
The System Admin can use the Users & Access dashboard to manage existing user access.
Follow these steps:
Log in to the Brilliyo System Admin account.
Open Access Control.
Select the Users & Access tab.
Find the user you want to manage.
Review their email, preset, and assigned products.
Open the available option under Actions to manage their access.
Update the available permissions or product access as required.
Save the changes if a save option is provided.
5. Give Access to a New User
The System Admin can provide access to another user through the New option.
Open Access Control.
Go to Users & Access.
Click New.
Enter the required user details.
Select the appropriate access preset or permissions, depending on the available options.
Assign the required Brilliyo products.
Review the selected access.
Submit the form to create the user's access.
Note: The exact fields and submission process depend on the New User form.
6. Access Requests
The Access Requests tab helps the System Admin review requests related to user access.
It can be used to check pending requests and manage approval-related activities.
For example, when a user requests access to a product or additional permissions, the System Admin can review the request from this section.
7. My Access
The My Access tab allows the currently logged-in user to review their own access information.
It helps the System Admin understand which products and permissions are assigned to their account.
8. Ownership
The Ownership tab contains ownership-related access information.
It helps manage or review access associated with workspace ownership.
9. Why Is Access Control Important?
Access Control is important for managing security and permissions across Brilliyo.
Its main benefits include:
Centralized user management.
Controlled access to Brilliyo products.
Easy management of user permissions.
Better control over administrative access.
Review of pending access requests.
Improved workspace security.
Clear separation of user roles and responsibilities.
10. Best Practices for System Admin
Give users access only to the products they need.
Review assigned permissions regularly.
Check pending access requests.
Avoid giving Admin access to every user.
Remove or update access when responsibilities change.
Verify user details before providing access.
Quick Navigation: System Admin → Access Control → Users & Access → Select User / New → Manage Product Access and Permissions.
Note: This documentation is based on the dashboard and tabs you shared. The exact editing, approval, and ownership actions should be confirmed against their respective screens before adding detailed button-by-button instructions.
Tags:
Related Documentation
Brilliyo Institute – Notifications
The Notifications feature helps institute administrators and staff stay updated about important activities happening inside their Brilliyo workspace. It displays alerts related to student management, financial transactions, CRM and lead management, emails, and other activities that users have permission to view. In simple words, Notifications work like an activity alert center, where users can check important updates without manually visiting every section of Brilliyo.
Brilliyo Institute – Payment Settings
The Payment Settings feature allows institutes to configure how they receive payments from students who purchase their courses or classes. Institutes can link their bank accounts to receive payments directly or use the manual settlement mode, where Brilliyo collects payments and settles them manually. This feature helps institutes manage course payment collection, track earnings, and monitor payouts.
Brilliyo Institute – Institute Management
The Institute feature allows users to create and manage their educational institutes on Brilliyo. Users can register an institute, select the required Brilliyo products, update institute details, manage branches, add metadata, and delete an institute when required. This feature helps institutes manage their institutional information and access different Brilliyo services from one place.