
Brilliyo Institute – Roles & Access Management
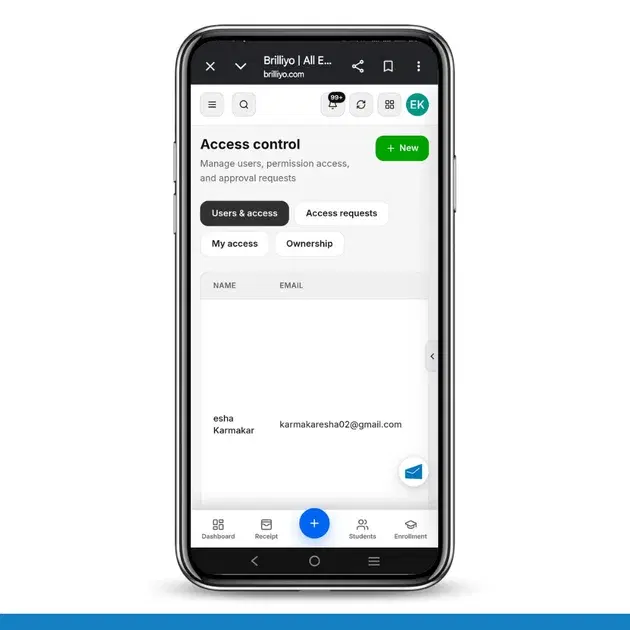
1. Overview
The Roles & Access feature allows institutes to manage staff accounts, assign product access, and control permissions for different staff members.
Institutes can decide which products and features each staff member can access based on their job responsibilities.
2. Open Users & Access
Follow these steps to open the feature:
Log in to your Brilliyo Institute account.
Open the Users & Access section.
You will find the following tabs:
Users & Access: View and manage staff accounts and their permissions.
Access Requests: View and manage pending access requests.
My Access: Check your own assigned access and permissions.
Ownership: View ownership-related access information.
3. View Existing Staff Access
In the Users & Access section, you can view the list of staff members and their assigned access.
The table includes the following details:
Column | Description |
|---|---|
Name | Staff member's name |
Registered email address | |
Preset | Assigned access preset, such as Admin |
Products | Products assigned to the staff member |
Pending Requests | Number of pending access requests |
Actions | Available management actions |
Example: An institute administrator may have access to Brilliyo ERP, CRM, Books, LMS, Attendance, Exams, Transport, and Account.
4. Add New Staff Access
To create a new staff account and assign permissions, follow these steps:
Step 1: Click New Staff Access
Open the Users & Access section.
Click New Staff Access.
A staff access form will open.
Step 2: Enter Staff Details
Fill in the required staff information:
Field | Description |
|---|---|
Name* | Enter the staff member's full name |
Email* | Enter the staff member's email address |
Mobile* | Enter the mobile number |
Job Title | Enter the staff member's designation, such as Accountant |
Branch | Select the branch where the staff member works |
Password* | Enter a password or use Generate Password |
Step 3: Select Product Access
Under Product Access, you can select the products and capabilities that the staff member needs.
Select the institute.
Choose the product, such as Brilliyo ERP.
Use the search option to find specific capabilities.
Select the required permissions one by one.
Important: Account access is separate from product access. Selecting product permissions does not automatically mean the staff member receives every product permission.
5. Understand Product Permissions
For Brilliyo ERP, permissions are organized into different categories.
Permission Category | Available Capabilities |
|---|---|
Course Management | Add Course, Edit Course, View Course, Delete Course, Manage Disciplines, Manage Subjects |
Student Management | Add Student, Edit Student, View Student, Delete Student, Bulk Upload Students |
Enrollment Management | Enroll Students, View Enrollments, Edit Enrollments, Bulk Upload Enrollments, Promote Students |
Branch & Institute Management | Manage Branches, Manage Institute, View Contacts, Manage Contacts |
Academic Management | Manage Timetable, Manage Attendance, Take Attendance, View Attendance Reports, Manage Examinations, Manage Assignments |
Student Corner | Manage Circulars, Manage Homework, Manage Library, View Student Results |
System Management | Add Role, Edit Role, View Roles, View Audits, View Dropped Out Students |
Employee Management | Add Employee, Edit Employee, View Employees, Delete Employee, Manage Employee Types, Change Employee Status |
6. Select Permissions
You can assign permissions according to the staff member's responsibilities.
Open the required permission category.
Review the available capabilities.
Select the permissions the staff member needs.
Use Select All if the staff member requires every capability in that category.
Repeat the process for other categories.
Review the selected permission count displayed below the product section.
For example, an accountant may need access to financial and payment-related features, while an academic coordinator may need student, attendance, and examination permissions.
7. Configure Notifications
After selecting product permissions, configure the notification channels.
Brilliyo provides three notification options:
Channel | Description |
|---|---|
In-app | Sends alerts through the notification bell and inbox |
Sends alerts to the staff member's registered email | |
Sends alerts to the registered mobile number |
Note: Notifications are sent only for actions that the assigned role has permission to perform. Email requires a valid email address, and WhatsApp requires a valid 10-digit mobile number.
8. Create Staff Access
Before submitting, review all the details:
Staff name and contact information
Job title and branch
Password
Selected product access
Assigned capabilities
Notification channels
Once everything is correct:
Click Create Staff Access.
The staff access creation process will be submitted.
9. Important Points
You can create separate staff accounts for different employees.
Permissions can be assigned according to job responsibilities.
Product access and account access are managed separately.
The Select All option allows you to select all capabilities within a category.
Only permitted actions can trigger role notifications.
You can use the Access Requests tab to review pending requests.
Quick Navigation: Users & Access → New Staff Access → Staff Details → Product Access → Select Capabilities → Notifications → Create Staff Access.
Tags:
Related Documentation
CRM – Inbox
The Inbox feature in Brilliyo CRM allows you to manage and respond to conversations with your leads from one place. You can search for leads, open their conversations, and continue communication directly from the CRM.
Report Card Module – User Guide
Before you begin, navigate to Courses → Report Card. This module allows you to create examinations, enter student marks, generate report cards, and prepare exam schedules.
Brilliyo CRM Leads Feature
Managing admissions and inquiries becomes much easier with the Brilliyo CRM Leads feature. It helps schools, colleges, coaching centers, and educational institutes track every lead from the first inquiry to final enrollment.