
https://brilliyo.com/workspace/digimaster-academy/placement-engine/placement-sheet
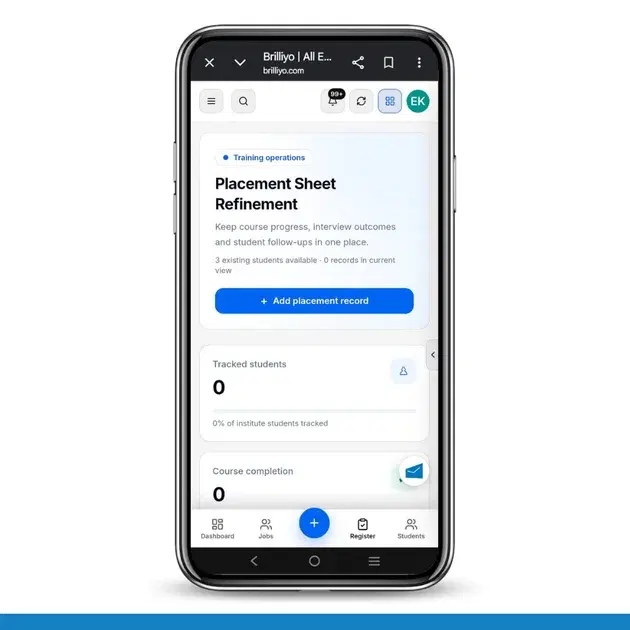
What is Placement Sheet?
The Placement Sheet feature in Brilliyo Placement Engine helps institutes maintain and track student placement records in one place. Placement coordinators can record course progress, placement status, interview history, follow-up tasks, and important student updates.
It is designed to help institutes monitor each student's journey from course preparation to interviews and final placement.
1. How to Add a Placement Record
The first step is to add an existing institute student to the placement sheet.
Step 1: Open Placement Sheet
Log in to your Brilliyo workspace.
Open Placement Engine.
Select Placement Sheet.
Click + Add placement record.
The Add placement record form will open.
Step 2: Select an Existing Student
Under Existing institute student, search for a student using:
Student name
Student ID (SID)
Email address
Phone number
Select the required student from the search results.
Important: You can only select students who are already registered with your institute. This form does not create a new student account.
Step 3: Enter Batch / Course Group
Enter the student's batch or course group.
Example: 2026 Batch
This helps the placement team identify which batch the student belongs to.
Step 4: Select Course Status
Choose the student's current course progress.
In progress – The student is currently completing the course.
Completed – The student has completed the course.
Step 5: Select Placement Status
Choose the student's current placement stage.
Not started – Placement activities have not started.
Preparing – The student is preparing for placement opportunities.
Interviewing – The student is participating in interviews.
Placed – The student has secured a placement.
Inactive – The student is currently inactive in the placement process.
Step 6: Add Company and Job Details
If the student has been placed, enter the following information:
Company (if placed): Enter the company name.
Role: Enter the job title or position.
Placement date: Select the date on which the student was placed.
These details help institutes maintain placement records.
Step 7: Complete the Refinement Checklist
The refinement checklist helps coordinators track whether important placement information has been reviewed and maintained.
It includes:
Placement sheet details reviewed – Mark this when the student's placement record has been checked.
Interview attempts and results maintained – Mark this when interview history and outcomes have been updated.
Follow-up records maintained – Mark this when the student's follow-up activities have been recorded.
Each checklist item can be maintained as Pending or marked as completed when reviewed.
Step 8: Add Coordinator Notes
Use Coordinator notes to record important information, such as:
Student placement progress
Interview preparation updates
Pending activities
Challenges or blockers
Important coordinator observations
Step 9: Save Placement Record
Review the entered information and click Save placement record.
The student's placement record will be added to the Placement Sheet.
2. Add Interview History
The Interviews section helps placement coordinators maintain a record of every interview attempt made by a student.
Step 1: Open Interviews
Inside the Add Placement Record form, open the Interviews tab.
Step 2: Click + Add Interview
Click + Add interview to add an interview entry.
Step 3: Maintain Interview Details
Add the relevant interview attempt information and its outcome in the interview form.
Maintain every interview attempt so the coordinator can review the student's interview progress and next action.
Step 4: Save the Interview Record
Save the interview entry and check the Interviews count. The interview history is maintained with the placement record.
3. Add Follow-up Tasks
The Follow-ups section helps coordinators plan and track the next action required for each student.
Step 1: Open Follow-ups
Inside the Add Placement Record form, select the Follow-ups tab.
Step 2: Click + Add Follow-up
Click + Add follow-up to create a new follow-up task.
Step 3: Assign Follow-up Details
Maintain the task information, including:
Owner: Assign the person responsible for the follow-up.
Due date: Set the date by which the task should be completed.
Next action: Record what needs to be done for the student.
Step 4: Save the Follow-up
Save the follow-up task. It will be maintained with the student's placement record.
Note: Interview and follow-up entries save placement tracking information only. They do not modify the student's original account data.
4. Placement Sheet Dashboard
After adding placement records, the Placement Sheet dashboard provides an overview of student placement activities.
It contains the following sections:
A. Placement Overview
3
Tracked Students
Students with placement records
Illustrative example
100%
Institute Students Tracked
3 out of 3 students
2
Course Completion
Students who completed their course
1
Actively Interviewing
Students currently in interviews
1
Overdue Follow-ups
Tasks that need attention
Illustrative sample figures for explaining the dashboard, not actual institute data.
The dashboard displays:
Tracked Students: Total students who have placement records.
Institute Students Tracked: Percentage of institute students covered by the placement sheet.
Course Completion: Number of students who have completed their courses.
Actively Interviewing: Number of students currently participating in interviews.
Overdue Follow-ups: Follow-up tasks that have passed their due dates and need attention.
B. Placement Pipeline
The Placement Pipeline shows how students are distributed across different placement stages.
Placement Pipeline
Illustrative distribution of 3 tracked students
Placed
1 student
Interviewing
1 student
Preparing
1 student
Not started
0 students
Inactive
0 students
Example only. Actual figures depend on saved placement records.
The five placement stages are:
Placed: Students who have secured jobs.
Interviewing: Students currently attending interviews.
Preparing: Students preparing for job opportunities.
Not started: Students whose placement activities have not started.
Inactive: Students currently inactive in the placement process.
C. Course Readiness
The Course Readiness section displays course completion information for tracked students.
For example:
Course Completion
67%
2
Completed
1
In progress
Illustrative example: 2 of 3 tracked students have completed their courses.
This section helps placement teams understand how many tracked students have completed their training and how many are still progressing.
5. Student Placement Records
At the bottom of the dashboard, the Student Placement Records section displays all saved placement records.
It includes the following columns:
Column | Information displayed |
|---|---|
Student | Student name and identity |
Course | Course or batch information |
Placement Status | Current placement stage |
Interviews | Number of interview attempts |
Next Follow-up | Upcoming follow-up information |
Updated | Last record update |
Actions | Available record actions |
Search and Filter Records
You can manage records using the available search and filter options:
Search student, batch, company: Find records using student names, batch names, or company names.
All course statuses: Filter records according to course progress.
All placement statuses: Filter students according to their placement stage.
All follow-ups: Filter records based on follow-up information.
Refresh: Reload the placement sheet to check updated information.
If no records have been created for a student, the dashboard indicates that the student is available when you add a placement record.
6. Why Should Institutes Use Placement Sheet?
Organized Student Records: Maintain placement information for existing institute students in one place.
Course Progress Tracking: Monitor whether students have completed their courses or are still in progress.
Interview History: Maintain interview attempts, results, and next actions.
Follow-up Management: Assign responsibilities and due dates to placement coordinators.
Placement Pipeline Visibility: Understand how many students are preparing, interviewing, placed, or inactive.
Better Coordination: Keep placement sheet details, interview updates, and follow-up records organized.
Progress Monitoring: Identify pending activities and students who need additional support.
Quick Navigation
Placement Engine → Placement Sheet → Add Placement Record → Select Existing Student → Enter Course & Placement Details → Add Interview History → Add Follow-ups → Save Placement Record
Important Notes
Only existing institute students can be selected.
Adding a placement record does not create a new student account.
Interview and follow-up records are maintained separately from the student's original account information.
Dashboard statistics reflect the placement records currently maintained in the placement sheet.
Students without placement records can be added using Add placement record.
Summary: Brilliyo Placement Sheet helps institutes maintain student placement records, track course completion, manage interview history, assign follow-up tasks, and monitor the complete placement pipeline from one dashboard.
Tags:
Related Documentation
Placement Engine – Job Profiles
The Job Profiles feature in Brilliyo Placement Engine helps institutes view global job profiles relevant to their students. It displays job profiles, matched students, and profile matching details based on the institute's scope. This feature helps institutes understand which job roles are relevant to their students and how many students match each job profile.
Brilliyo Placement Engine – Matched Jobs
The Matched Jobs feature in Brilliyo Placement Engine helps institutes view job opportunities that are matched to their students. It provides an overview of relevant jobs, the students represented in those matches, and the average match score returned by the system. The goal is to help placement teams identify relevant job opportunities for students and organize placement activities more effectively.
Brilliyo Placement Engine – Benefits and Dashboard Overview
The Brilliyo Placement Engine helps educational institutes manage student placement activities from one place. It provides a clear overview of student profiles, resumes, job opportunities, and resume processing status through a centralized Placement Dashboard. Institutes can use it to monitor students' placement readiness, identify incomplete profiles, track resumes, and keep an eye on available job opportunities.